

Polkadot is a fast-growing ecosystem that enables cross-chain communication within its parachains. Such interoperability and scalability can take blockchain technology to the next level and solve multiple problems like low TPS, high transaction fees, hard forks, and more.
|
“Polkadot is a sharded blockchain, meaning it connects several chains in a single network, allowing them to process transactions in parallel and exchange data between chains with security guarantees” |
Talentica’s blockchain team has a lot of experience in building blockchain-based solutions and we always observed evolving innovative technologies to increase our blockchain expertise. We have been working on multiple blockchain frameworks. Among those, we found Polkadot gaining a lot of traction recently. We started exploring this protocol and did some hands-on. Our prior experience with blockchain technology and Rust programming language helped us to gain a good grasp on the framework.
In this blog, I’ll help you understand how to develop and launch a simple Parachain project on Polkadot in the following sections. It is not intended to explore the basics of Polkadot in detail here, but the article will help you have a working local environment for Polkadot parachain development and get familiar with the development process.
Local Setup
Polkadot provides PDKs (which stands for Parachain Development Kit) to ease the development. Currently, there are two functioning PDKs which are Substrate and Cumulus.
The substrate is the underlying framework on which Polkadot itself is built. It is a toolset for blockchain innovators that provides the necessary building blocks for constructing a chain.
Cumulus provides the consensus implementation for a Parachain and the block production logic. It has the interfaces and extensions to convert a Substrate FRAME runtime into a Parachain runtime.
We will do some significant compiling while performing the steps below as everything has to be built locally in the system. Compiling can take noticeable time (based on your system configuration) and storage space.
Install Substrate Prerequisites
Follow the instructions at https://substrate.dev/docs/en/knowledgebase/getting-started/ for setting up a local development environment for Substrate.
Compile the Relay Chain
|
# Compile Polkadot with the real overseer feature git clone https://github.com/paritytech/polkadot cd polkadot git fetch git checkout rococo-v1 cargo build –release –features=real-overseer # Generate a raw chain spec ./target/release/polkadot build-spec –chain rococo-local –disable-default-bootnode –raw > rococo-local-cfde-real-overseer.json |
Clone the Substrate Parachain Template
Substrate Parachain Template internally uses Cumulus to convert the substrate sovereign chain to Polkadot parachain. We will use this template as a starting point for our parachain development.
|
# Clone substrate-parachain-template repo git clone https://github.com/substrate-developer-hub/substrate-parachain-template.git |
Building a Simple Parachain on Polkadot
In this section, we will create a custom “Proof of Existence” chain using the Substrate blockchain development framework and FRAME runtime libraries. This chain is made with the help of substrate tutorials provided by the substrate dev team.
We will use Substrate to create our runtime logic, which will be then compiled to a Wasm executable. This Wasm code blob will contain the entire state transition function of the chain, and is what we will need to deploy our project to Polkadot as a parachain.
About Proof of Existence
Proof of existence is a service that enables the identification of the real owner of a computer file. A user submits a file to the application, from the submitted file a hash value is calculated. The calculated hash can be safely assumed to be unique for an individual file. The hash value of this file is then mapped with some unique properties of the user for identification. A user with the original file can prove his ownership by simply recomputing the hash and matching it with the one stored in the blockchain. With this mechanism, we can certify the existence, ownership, and integrity of the document without the need for a central authority.
Interface and Design
Our PoE API will expose two callable functions:
- create_claim – allows a user to claim the existence of a file by uploading a file digest.
- revoke_claim – allows the current owner of a claim to revoke their ownership.
To implement this, we will only need to store information about the proofs that have been claimed, and who made those claims.
Building a Custom Pallet
The Substrate Parachain Template has a FRAME-based runtime. FRAME is a library of code that allows you to build a Substrate runtime by composing modules called “pallets”. You can think of these pallets as individual pieces of logic that define what your blockchain can do! The substrate provides you with multiple pre-built pallets for use in FRAME-based runtimes.
For example, FRAME includes a Balances pallet that controls the underlying currency of your blockchain by managing the balance of all the accounts in your system.
File Structure
Most of our changes will be in the pallets/template/src/lib.rs file inside the substrate parachain template. You can open the Substrate Parachain Template in any code editor, then open the file pallets/template/src/lib.rs
There will be some pre-written code that acts as a template for a new pallet. You can read over this file if you’d like, and then delete the contents since we will start from scratch for full transparency.
Imports and Dependencies
Add the below imports to the file.
|
#![cfg_attr(not(feature = “std”), no_std)] use frame_support::{ decl_module, decl_storage, decl_event, decl_error, ensure, StorageMap }; use frame_system::ensure_signed; use sp_std::vec::Vec; |
Most of these imports are already available because they were used in the template pallet whose code we just deleted. However, sp_std is not available and we need to list it as a dependency.
Add this block to your pallets/template/Cargo.toml file.
|
[dependencies.sp-std] default-features = false version = ‘2.0.0’ |
Then, Update the existing [features] block to look like this.
|
[features] default = [‘std’] std = [ ‘codec/std’, ‘frame-support/std’, ‘frame-system/std’, ‘sp-std/std’, <– This line is new ] |
Configuration
Every pallet has a component called Trait that is used for configuration.
|
/// Configure the pallet by specifying the parameters and types on which it depends. pub trait Trait: frame_system::Trait { /// Because this pallet emits events, it depends on the runtime’s definition of an event. type Event: From<Event<Self>> + Into<<Self as frame_system::Trait>::Event>; } |
Events
Our pallet will only emit an event in two circumstances:
- When a new proof is added to the blockchain.
- When proof is removed.
|
// Pallets use events to inform users when important changes are made. // Event documentation should end with an array that provides descriptive names for parameters. decl_event! { pub enum Event<T> where AccountId = <T as frame_system::Trait>::AccountId { /// Event emitted when a proof has been claimed. [who, claim] ClaimCreated(AccountId, Vec<u8>), /// Event emitted when a claim is revoked by the owner. [who, claim] ClaimRevoked(AccountId, Vec<u8>), } } |
Errors
An error can occur when attempting to claim or revoke proof.
|
// App errors are declared here decl_error! { pub enum Error for Module<T: Trait> { /// The proof has already been claimed. ProofAlreadyClaimed, /// The proof does not exist, so it cannot be revoked. NoSuchProof, /// The proof is claimed by another account, so the caller can’t revoke it. NotProofOwner, } } |
Storage
To add a new proof to the blockchain, we will simply store that proof in our pallet’s storage. To store that value, we will create a hashmap from the proof to the owner of that proof and the block number the proof was made.
|
// The pallet’s runtime storage items. decl_storage! { trait Store for Module<T: Trait> as TemplateModule { /// The storage item for our proofs. /// It maps proof to the user who made the claim and when they made it. Proofs: map hasher(blake2_128_concat) Vec<u8> => (T::AccountId, T::BlockNumber); } } |
If proof has an owner and a block number, then we know that it has been claimed! Otherwise, the proof is available to be claimed.
Callable Functions
As implied by our pallet’s events and errors, we will have two “dispatchable functions” the user can call in this FRAME pallet:
- create_claim(): Allow a user to claim the existence of a file with proof.
- revoke_claim(): Allow the owner of a claim to revoke their claim.
|
// Dispatchable functions allow users to interact with the pallet and invoke state changes. // These functions materialize as “extrinsic”, which are often compared to transactions. // Dispatchable functions must be annotated with weight and must return a DispatchResult. decl_module! { pub struct Module<T: Trait> for enum Call where origin: T::Origin { // Errors must be initialized if they are used by the pallet. type Error = Error<T>; // Events must be initialized if they are used by the pallet. fn deposit_event() = default; /// Allow a user to claim ownership of an unclaimed proof. #[weight = 10_000] fn create_claim(origin, proof: Vec<u8>) { // Check that the extrinsic was signed and get the signer. // This function will return an error if the extrinsic is not signed. let sender = ensure_signed(origin)?; // Verify that the specified proof has not already been claimed. ensure!(!Proofs::<T>::contains_key(&proof), Error::<T>::ProofAlreadyClaimed); // Get the block number from the FRAME System module. let current_block = <frame_system::Module<T>>::block_number(); // Store the proof with the sender and block number. Proofs::<T>::insert(&proof, (&sender, current_block)); // Emit an event that the claim was created. Self::deposit_event(RawEvent::ClaimCreated(sender, proof)); } /// Allow the owner to revoke their claim. #[weight = 10_000] fn revoke_claim(origin, proof: Vec<u8>) { // Check that the extrinsic was signed and get the signer. // This function will return an error if the extrinsic is not signed. let sender = ensure_signed(origin)?; // Verify that the specified proof has been claimed. ensure!(Proofs::<T>::contains_key(&proof), Error::<T>::NoSuchProof); // Get the owner of the claim. let (owner, _) = Proofs::<T>::get(&proof); // Verify that the sender of the current call is the claim owner. ensure!(sender == owner, Error::<T>::NotProofOwner); // Remove claim from storage. Proofs::<T>::remove(&proof); // Emit an event that the claim was erased. Self::deposit_event(RawEvent::ClaimRevoked(sender, proof)); } } } |
Compiling the Parachain
After you’ve copied all of the parts of this pallet correctly into your pallets/template/lib.rs file, you should be able to compile your node without warning or error. Run this command in the root directory of the substrate-parachain-template repository to build the node:
|
# Build the parachain template collator cargo build –release # Print the help page to ensure the node built correctly ./target/release/parachain-collator –help |
Starting the Nodes
Launch Relay Chain
Run these commands inside the polkadot directory.
|
# Alice ./target/release/polkadot –chain rococo-local-cfde-real-overseer.json –alice –tmp # Bob (In a separate terminal) ./target/release/polkadot –chain rococo-local-cfde-real-overseer.json –bob –tmp –port 30334 |
After starting Bob’s node, Bob’s terminal log should display 1 peer. If not, your local nodes are not discovering each other, in that case, you can add –discover-local subcommand at the end of Bob nodes launch command.
|
# Bob – If local nodes failed to discover each other ./target/release/polkadot –chain rococo-local-cfde-real-overseer.json –bob –tmp –port 30334 –discover-local |
If the problem persists, we have to explicitly specify the bootnodes. For that –bootnodes /ip4/<Node IP>/tcp/<Node p2p port>/p2p/<Node Peer ID> subcommand can be added. To give Alice as Bob’s boot node we have to provide the Alice nodes details with the boot nodes subcommand.
Alice Node IP: 127.0.0.1 (As all the nodes are running in local).
Alice Node p2p port: 30333 (By default, if not specified, any node’s p2p will try to run on 30333 port).
Alice Node Peer ID: Check the Local node identity in Alice Node’s terminal log.
|
# Bob – If local nodes failed to discover each other ./target/release/polkadot –chain rococo-local-cfde-real-overseer.json –bob –tmp –port 30334 –bootnodes /ip4/127.0.0.1/tcp/30333/p2p/12D3KooWCL7XCABhEDuMQFNe2dmemtecfMaQueYb5dWstrRNCGAz |
Export Parachain Genesis State and Wasm
Run these commands inside the substrate-parachain-template directory.
|
# Export genesis state # –parachain-id 200 as an example that can be chosen freely. Make sure to everywhere use the same parachain id ./target/release/parachain-collator export-genesis-state –parachain-id 200 > genesis-state # Export genesis wasm ./target/release/parachain-collator export-genesis-wasm > genesis-wasm |
Launch the Parachain
Run these commands inside the substrate-parachain-template directory.
|
# Replace <parachain_id_u32_type_range> with the parachain id # Collator 1 ./target/release/parachain-collator –collator –tmp –parachain-id <parachain_id_u32_type_range> –port 40335 –ws-port 9946 — –execution wasm –chain ../polkadot/rococo-local-cfde-real-overseer.json –port 30335 # Collator 2 ./target/release/parachain-collator –collator –tmp –parachain-id <parachain_id_u32_type_range> –port 40336 –ws-port 9947 — –execution wasm –chain ../polkadot/rococo-local-cfde-real-overseer.json –port 30336 # Parachain Full Node 1 ./target/release/parachain-collator –tmp –parachain-id <parachain_id_u32_type_range> –port 40337 –ws-port 9948 — –execution wasm –chain ../polkadot/rococo-local-cfde-real-overseer.json –port 30337 |
A collator node maintains a full node for the parachain as well as the relay chain. It can be noticed in the above commands that several arguments are passed before the lone –, and several more are passed after it. The arguments passed before — are for the actual collator (parachain) node, and the arguments after the — are for the embedded relay chain node.
Similar to the relay chain if your local nodes are not able to detect each other, you can use the boot nodes subcommand. But in the parachain case, you have to provide the parachain boot node (Collator 1 – Use the Parachain Local node identity) before — and relay chain boot node (Alice) after –.
|
# Collator 2 – If local nodes failed to discover each other ./target/release/rococo-collator –collator –tmp –parachain-id <parachain_id_u32_type_range> –port 40336 –ws-port 9947 –bootnodes /ip4/127.0.0.1/tcp/40335/p2p/12D3KooWLVBrvKY6r965cYXX3YQq98JTPEbPym1zHhPvNnW8x8EH — –execution wasm –chain ../polkadot/rococo-local-cfde-real-overseer.json –port 30336 –discover-local –bootnodes /ip4/127.0.0.1/tcp/30333/p2p/12D3KooWCL7XCABhEDuMQFNe2dmemtecfMaQueYb5dWstrRNCGAz |
Register the parachain
Open Polkadot-js App and connect to your local relay chain node(Alice/Bob). After successful connection goto Developer→Sudo and fill in the data like the image below.
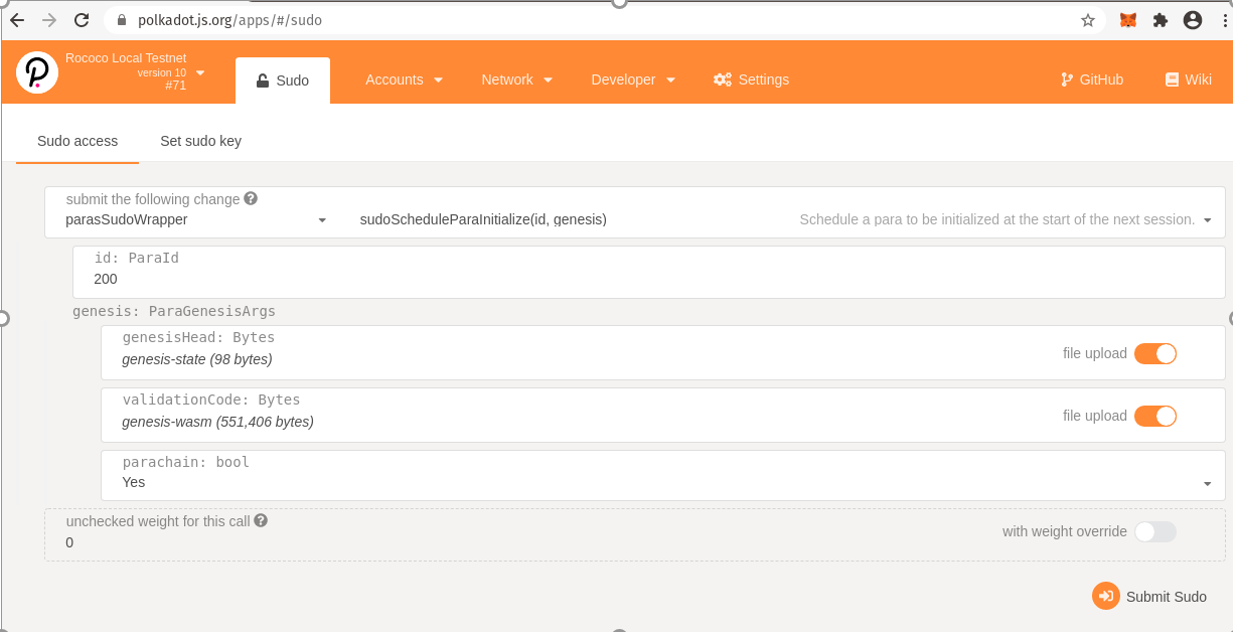
Once the parachain is registered, you can explore more on the Polkadot-js to get familiar with the app.
Interacting with Proof of Existence Pallet
After successfully registering the parachain, now we should be able to use our parachain to create/revoke a claim on a file.
The Polkadot-js app allows users to interact with all the available pallets in the node. Connect your parachain node with the Polkadot-js app and go to Developer→Extrinsic. Here, select the templateModule pallet and createClaim function. Then select a file to be claimed from your computer and submit the transaction.
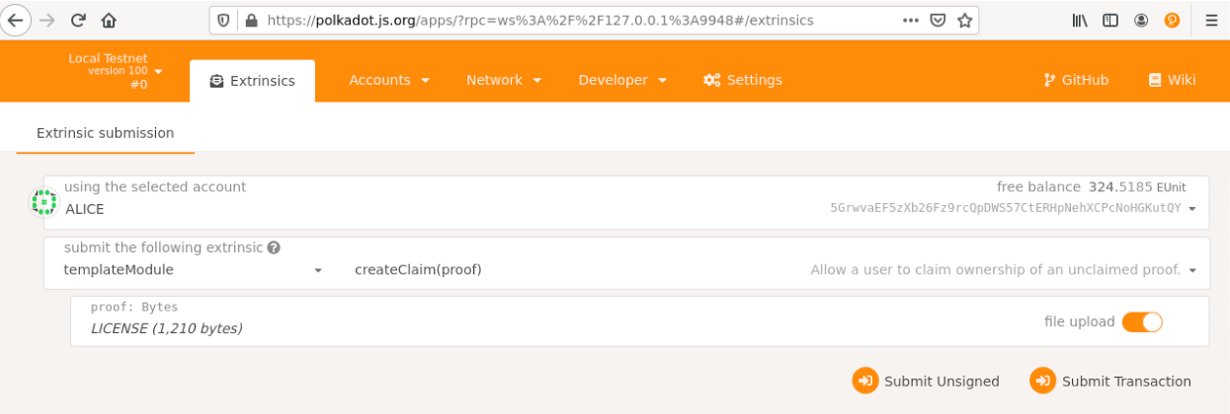
If all went well, once the Block is finalized you should see a success message on the screen. Remember, only the owner can revoke the claim! If you select another user account and try to claim the same file, it will throw an error saying The proof has already been claimed.
| Note – The Polkadot-js app can be used as an initial testing platform for your parachain. Making a complete application will require you to have a custom UI. You can follow Polkadot’s documentation on tools, utilities, and libraries which will help your front-end javascript application to interact with the polkadot network. |