Introduction
In continuation with our previous post titled “QoS using OpenDaylight”, in this blog post, we explain how to use meters in OpenFlow 1.3 and implement QoS using meters in a network topology created using mininet and OpenDaylight(ODL) controller.
OpenFlow meters
A meter is a switch element which measures and controls the ingress rate of packets which is the rate of packets prior to the output. Meters have been introduced in OpenFlow protocol in version 1.3 as an optional feature. Unlike queues, meters are created and managed by OpenFlow protocol in meter table on the switch and attached directly to the flows instead to the switch ports. A meter has a component called meter band which specifies the rate at which meter is applied. A meter can have one or more meter bands but only a single band is applied for a flow at a time based on the measured packets rate. A flow which is mapped to a meter, directs packets to the meter which measures the rate of the packets and activates appropriate meter band if the measured rate of packets go beyond the rate defined in meter band. As meters are not required features, all implementations of software switch doesn’t support meters. Until the time of our testing, ofsoftswitch13 supports meters where as Open vSwitch(v2.5) does not support meters.
Installing Ofsoftswitch13
To use meters, first we need to install ofsoftswitch13 which supports meters. Install CPqD/Ofsoftswitch13 with mininet using this link.
Also, we assume that ODL controller is installed with required features and working on your system.
Configuring meters in Ofsoftswitch13
To implement quality of service (QoS) using meters in ofsoftswitch13 switch, we need to create a meter and add the meter in the desired flow by specifying the meter in the instruction set of the flow using the meter Id. Below is a dpctl command to add a rate limiter meter with drop rate of 10 MB on a switch s1:
sudo dpctl unix:/tmp/s1 meter-mod cmd=add,flags=1,meter=1 drop:rate=10000
Below is the dpctl command to get meter configuration:
sudo dpctl unix:/tmp/s1 meter-config
Below is the command to add a meter in a flow
sudo dpctl unix:/tmp/s1 flow-mod table=0,cmd=add in_port=1 meter:1 apply:output=2
Implementing Meters in ODL using REST API
1. Create a single switch, 2 hosts mininet topology using command below:
sudo mn --topo single,2 --mac --switch user --controller=remote,ip=127.0.0.1
Before using meters in flow entries we need to install meter on the switch. Create a meter using ODL Rest API as mentioned below.
2. Submit a HTTP PUT request using Postman to the ODL controller using headers:
- Use URL: http://<controller IP>:8181/restconf/config/opendaylight-inventory:
nodes/node/openflow:1/meter/1 - Method: PUT
- Content Type: application/xml
- Authorization: Basic Auth (username/password : admin/admin)
Set body of the request as shown in code block below.
<meter xmlns="urn:opendaylight:flow:inventory">
<meter-id>1</meter-id>
<meter-band-headers>
<meter-band-header>
<band-id>0</band-id>
<band-rate>10000</band-rate>
<band-burst-size>0</band-burst-size>
<meter-band-types>
<flags>ofpmbt-drop</flags>
</meter-band-types>
<drop-burst-size>0</drop-burst-size>
<drop-rate>10000</drop-rate>
</meter-band-header>
</meter-band-headers>
<meter-name>guestMeter</meter-name>
<container-name>guestMeterContainer</container-name>
<flags>meter-kbps</flags>
</meter>
Next, Install a flow entry specifying meter you created in above step in its instruction set using ODL Rest API as mentioned below.
3. Submit a HTTP PUT request using Postman to the ODL controller using headers:
- Use URL: http://<controller IP>:8181/restconf/config/opendaylight-inventory:nodes/node/openflow:1/table/0/flow/L2_Rule_h1_to_h2
- Method: PUT
- Content Type: application/xml
- Authorization: Basic Auth (username/password : admin/admin)
Set body of the request as shown in code block below.
<flow xmlns="urn:opendaylight:flow:inventory">
<id>L2_Rule_h1_to_h2</id>
<instructions>
    <instruction>
        <order>0</order>
            <meter>
                <meter-id>1</meter-id>
            </meter>
    </instruction>
    <instruction>
        <order>1</order>
        <apply-actions>
            <action>
            <order>1</order>
            <output-action>
                <output-node-connector>2</output-node-connector>
                <max-length>65535</max-length>
            </output-action>
            </action>
        </apply-actions>
    </instruction>
</instructions>
<barrier>true</barrier>
<flow-name>L2_Rule_h1_to_h2</flow-name>
<match>
    <ethernet-match>
        <ethernet-destination>
            <address>00:00:00:00:00:01</address>
        </ethernet-destination>
        <ethernet-type>
            <type>2048</type>
        </ethernet-type>
        <ethernet-source>
            <address>00:00:00:00:00:02</address>
        </ethernet-source>
    </ethernet-match>
</match>
<hard-timeout>0</hard-timeout>
<priority>20</priority>
<table_id>0</table_id>
<idle-timeout>0</idle-timeout>
</flow>
Iperf Testing
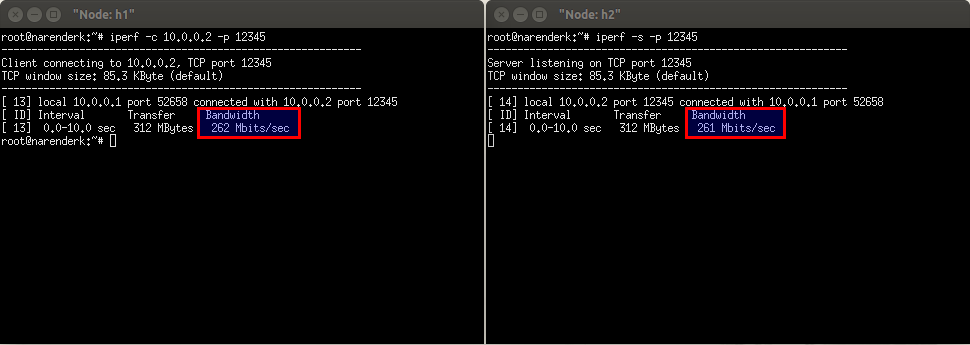
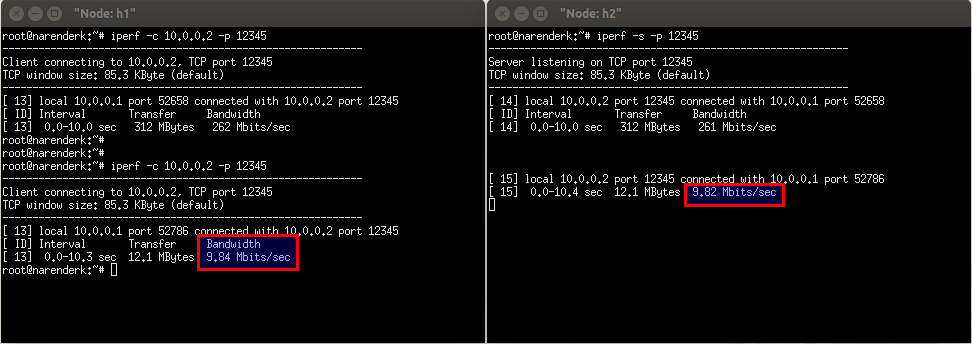
You can implement QoS through meters by limiting bandwidth in iperf data transfer for a flow. To test, start iperf server on h2 on port some port e.g. 12345 and send data from h1 on that port. Below, we are attaching some screen shots for reference:
Before implementing QoS:
After implementing QoS:
Using ODL meter Java API
You can also create meter using Java API in your ODL application. You can refer ourcaptive portal application on ODL in git for more details. Below is the example code to create a rate limiter meter with name as guestMeter and meter id = 1:
public static void createMeter(DataBroker dataBroker, NodeId nodeId, long bandRate, long dropRate) throws Exception {
 meterBuilder.setMeterId(new MeterId(1L));
 meterBuilder.setKey(new MeterKey(new MeterId(1L)));
 meterBuilder.setContainerName("guestMeterContainer");
 meterBuilder.setMeterName("guestMeter");
 meterBuilder.setFlags(new MeterFlags(false, true, false, false));
 meterBuilder.setMeterBandHeaders(new MeterBandHeadersBuilder()
                 .setMeterBandHeader(Collections.singletonList(new MeterBandHeaderBuilder()
                    .setBandId(new BandId(0L))
                    .setBandRate(bandRate)
                    .setMeterBandTypes(new MeterBandTypesBuilder()
                    .setFlags(new MeterBandType(true, false, false))
                 .build())
                 .setBandBurstSize(0L)
                 .setBandType(new DropBuilder()
                    .setDropRate(dropRate)
                    .setDropBurstSize(0L)
                    .build())
                 .build()))
             .build());
Meter meter = meterBuilder.build();
 InstanceIdentifier meterIID = InstanceIdentifier.create(Nodes.class)
                                  .child(Node.class, new NodeKey(nodeId))
                                  .augmentation(FlowCapableNode.class)
                                  .child(Meter.class, new MeterKey(meter.getMeterId()));
 CommonUtils.writeData(dataBroker,LogicalDatastoreType.CONFIGURATION,meterIID,meter,true);
}
After installing the meter we can specify the meter in the instruction set of the flow by referring the id of the meter. Below is the example code:
List instructions = Lists.newArrayList();
MeterCaseBuilder meterCaseBuilder = newMeterCaseBuilder();
MeterBuilder meterBuilder = newMeterBuilder();
meterBuilder.setMeterId(newMeterId(1L));
meterCaseBuilder.setMeter(meterBuilder.build());
InstructionBuilder ib = newInstructionBuilder();
ib.setInstruction(meterCaseBuilder.build());
ib.setOrder(1);
ib.setKey(newInstructionKey(1));
instructions.add(ib.build());
Conclusion
In this post we explained how to use OpenFlow meters in ofsoftswitch and implemented QoS by limiting bandwidth using ODL controller.