This blog details building an openCV using extra modules, mainly the opencv_contirb, in Windows.
Prerequisites:
- Download and install Visual Studio 2015 and CMake.
NOTE: By default, C++ is not installed in Visual Studio 2015. After basic installation, modify the installation by following the path : Programming Language -> C++) - Download and install the following Python packages to their default locations:
- 1. Python 2.7.x
- 2. Numpy
- 3. Matplotlib(required since we use it for visualizations in our project)
Step 1:
Go to C:/Python27/lib/site-packeges (the site-packages folder where your python is installed), and delete cv2.pyd if present.
Step 2:
Downloading OpenCV with extra modules
- Create a directory called opencv-3.0 and create two other folders in the directory: build and source.
The builddirectory is used for saving the result of the building process, and the source folder will contain all of the OpenCV and its extra modules sources.
- Download OpenCV sources together with the extra modules from the following websites:

- OpenCV: https://github.com/Itseez/opencv
- Extra Modules: https://github.com/Itseez/opencv_contrib
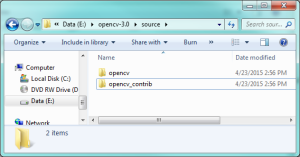
- Once downloaded, unzip each of them to designated folders as shown in the following image:
Creating a Visual Studio project with CMake
We will use the CMake application to create an OpenCV Visual Studio project. The OpenCV Visual Studio project will be used later to build the OpenCV library together with the extra modules.
- Launch the CMake application and specify the source and build directory.
- In Where is the source code, enter the directory path of the OpenCV source.
- In Where to build the binaries, enter the directory path of the designated build folder.
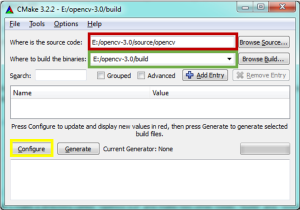
- Click Configure.
The OpenCV library is created.
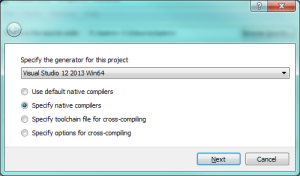
Since I have used Visual Studio 14 2015, I will use the following configuration. You can also use visual studio 13.
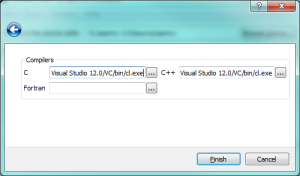
5. Click Next and specify the C and C++ compilers. We can use the compiler in our local machine which is located in {Visual Studio}/VC/bin/cl.exe.
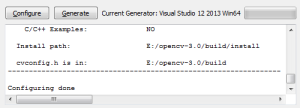
6. Click Finish and wait until CMake completes the initial configuration. The following image displays when the process is complete:
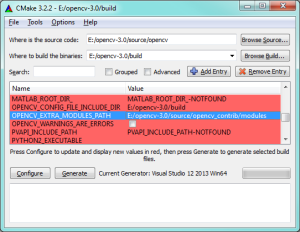
7. Specify the extra modules path {opencv-3.0}/source/opencv_contrib /modules, as shown in the image below:
You will see all the fields marked in red.
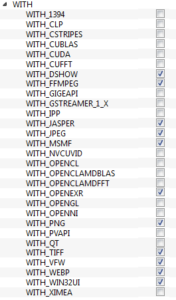
8. Click on WITH to expand and decide what extra features you need and mark the appropriate fields:
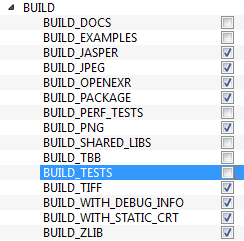
9. Click BUILD to expand.

Info:
The initial fields configure the build method and the remaining fields specify the modules that must be built. Since GPU modules are not yet supported by OpenCV-Python, you can completely avoid it to save time (but if you work with GPU modules, keep the modules intact).
Some of the openCV modules are not present in actual implementation. Do not worry about that.
9. Configure the OpenCV modules from contrib:
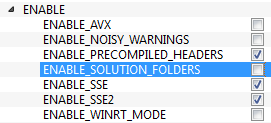
10. Click ENABLE to expand. Ensure the ENABLE_SOLUTION_FOLDERS is cleared and is using Visual Studio Express edition (Solution folders are not supported by Visual Studio Express edition):
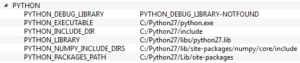
11. Ensure all the fields are filled in PYTHON (ignore PYTHON_DEBUG_LIBRARY):
NOTE:
You can clear fields that are trivial to speed up the building process. For example: BUILD_DOCS. However, if you are unsure about what a particular field is about, leave it as it is.
12. After the reconfiguration, click Configure.
Ensure the desired extra modules are on the list at CMake GUI > Configuration Log > OpenCV > To be built.
Following table is an example of re-configuring the CMake with extra modules.
| To be built | hal core flann imgproc ml photo reg surface_matching video face imgcodecs shape videoio highgui objdetect optflow superres tracking ts ximgproc xobjdetect xphoto adas bgsegm bioinspired features2d latentsvm line_descriptor saliency text calib3d ccalib datasets rgbd videostab xfeatures2d stitching |
| Disabled | world contrib_world |
| Disabled by dependency | – |
| Unavailable | androidcamera cudaarithm cudabgsegm cudacodec cudafeatures2d cudafilters cudaimgproc cudalegacy cudaobjdetect cudaoptflow cudastereo cudawarping cudev java python2 python3 viz cvv matlab |
13. To start generating the Visual Studio project, click Generate.
Your build directory is fulfilled with OpenCV Visual Studio project.
14. Go to opencv/build folder and opensln with Visual Studio.
15. In the solution explorer, right click on CmakeTargets > All_BUILD and check build mode as Release instead of Debug.
16. In the window that pops up, click on Configuration Manager and select the active mode as Release instead of Debug.
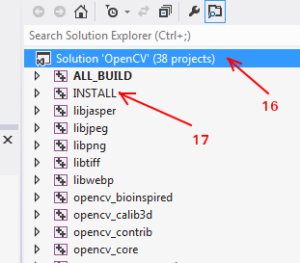
17. In the solution explorer, right-click on the Solution (or ALL_BUILD) and build. It will take some time to finish.
18. Right-click on INSTALL and build it. OpenCV-Python installs.
19. Open Python IDLE and enter import cv2. If there is no error, then the installation is successful.
References:
- http://eavise.wikispaces.com/Building+OpenCV+yourself+on+Windows+7+x64+with+OpenCV+2.4.5+and+CUDA+5.0
- https://putuyuwono.wordpress.com/2015/04/23/building-and-installing-opencv-3-0-on-windows-7-64-bit/
- http://opencv-python-tutroals.readthedocs.io/en/latest/py_tutorials/py_setup/py_setup_in_windows/py_setup_in_windows.html